Salmon Fence
By lviathan|BY-NC-SA 4.0 License|Created April 20th, 2019


This was my first real SO project. I needed to replace a small independent section of fence. It is adjacent to a longer run of fencing so I needed to match the board type and style. I would do a variety of things differently if I did the project over again or without some of the constraints I had but I am pleased with how it turned out overall.
2 hr
Easy
5
Files included (1)
2x 4x4x8' cedar posts
3x 2x4x8' cedar studs
17x 5/8x5.5x5' rough cedar picket boards
6x .75x.75x8' hemlock furring strips
SO
1/8" spiral upcut bit
Pocket hole jig
Finish nailer
Plunge saw
I started by building the frame with the cedar lumber. I had some narrow constraints for where it is located so I couldn’t just buy a pre-built segment. The frame is about 44”x 92”, the bottom of the frame will be 2” above grade and the legs 18” underground. It’s constructed with self-sinking deck screws in pocket holes.
I purchased a salmon svg off Etsy to cut into the fence. There are three copies, all 10”x32”; lower left, middle center and upper right. I don’t think I have rights to share it so the attached project file is totally unrelated- they made me include one to make the project public. The link to the file if you want it is here: https://tinyurl.com/y244jh7s
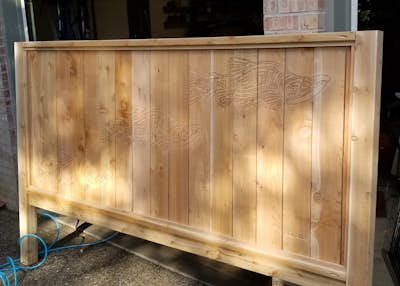
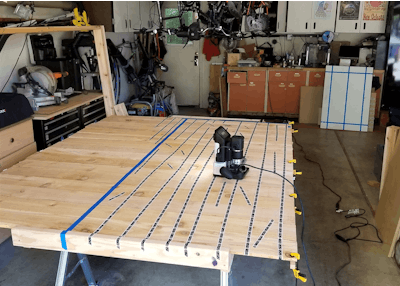
The panel is made of 5.5” rough cedar picket boards. I built a 2x4 frame on saw horses to hold them while cutting. The top edge is covered in double sided tape. The near end of the frame is slightly higher and holds the first board firm. I secured the last board with screws and covered the whole surface with Sharper tape. I cut all the designs with the SO 1/8” spiral upcut.
A couple of problems that I encountered at this point: 1) the frame I worked on didn’t support the 5/8” boards very well and they bowed while working which SO hated. It also made the tape come loose so I had a lot of “Tape Movement” errors. 2) the tape movement was worse because this is rough cedar but I did find that if I used the edge of a hockey puck and rolled it along the tape with some pressure the tape adhered pretty well. 3) I didn’t think about how much clearance the SO requires to the cut. My initial board was held in place by a lip about ½” above the surface and about 4” from the edge of the lower left salmon which wasn’t enough room for the very edge of the design.
I created new workspaces for each salmon and added to each scan occasionally. I ended up using a stupid amount of tape. It took me a little over 2 hours for each salmon and while not as accurate as a more secure piece, it came out pretty well.
I trimmed the boards to fit and secured in the frame with the hemlock strips and finish nailer. The boards are spaced for expansion but securely attached to the top and bottom. I am going to put waterproofing on the legs and protectant on the rest and install this weekend.
I think this is a great application for the SO- large scale design work is right in its sweet spot. If I had to do it again, I would have better supported the panel boards on a sheet of plywood. If I hadn’t had the constraint to rough cedar, I could have done a couple of things including: a) used surface material that would have been much faster to cut and b) used interlocking boards that I could have stained after cutting and then sanded the surface back down to really make the design pop. If I didn’t have the space constraints, I can see buying pre-built panels and carving right on them which would be super-fast.
In any case, fun first project- I learned a lot.