Media Cabinet / TV Stand
By Liz|BY-NC-SA 4.0 License|Updated December 29th, 2020


A mid-century modern style plywood cabinet. Designed to hold your TV and associated devices.
Intermediate
13
Files included (6)
1" plywood with maple veneer on both sides
3/4" plywood with maple veneer on both sides
Wood Glue
Shaper Tape
Sandpaper
Dead Flat Finish
Paint Roller & Tray
MDF spoil-board
Shaper Origin
Hand Plane
Band Clamps or 4'+ pipe clamps
Regular Clamps
Vertical Workstation
Table Saw or Track Saw
Nail Gun (optional)
1. Cut out all pieces using the table or track saw:
-From 1" thick ply cut top, bottom, and 2 sides with the table saw.
-From 3/4" thick ply cut the middle shelf and the two dividers
2. With origin use a grid to place the svgs on each side as appropriate and cut the dado joints as follows:
- top and bottom edge dados for the sides should be 3/4" deep. Make sure to use 1" scrap material around the cut to support origin
- all other dados will be 1/4" deep. Make sure to cut dados on both sides of the middle shelf.
3. Sand faces that will be hard to reach later, particularly faces inside the cabinet
4. Glue and clamp. You may want to use band clamps or 4'+ pipe clamps for the length of the cabinet. Use a square and level to ensure that everything is lined up properly.
This job is easier with a friend.
5. Cut 8 of the "leg" pattern from 3/4" ply
6. Glue up pairs of leg pieces together to make 4 legs.
- gravity can help you line up the pieces if you rest the legs on the long flat face while gluing.
7. Sand legs to remove excess glue and even out any faces that were not perfectly aligned while gluing
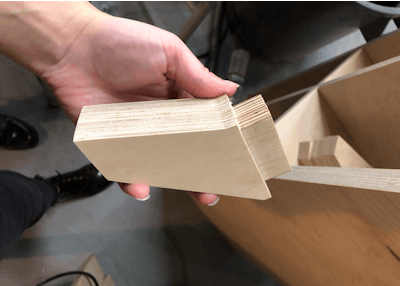
8. Using the vertical workstation cut tenons on the legs. Cut to a depth of 3/4".
9. After glue has dried on the cabinet plane down the joint where the side meets the top and bottom as the side will likely be a bit proud
10. Cut mortises on bottom of cabinet to a depth of 3/4"
- cut first to 0 offset, then test and adjust the offset until your legs just fit
11. Glue legs in
12. Finish with a roller and Dead Flat, sanding between coats.