Whiskey Box
By Eric19|BY-NC-SA 4.0 License|Created July 17th, 2019
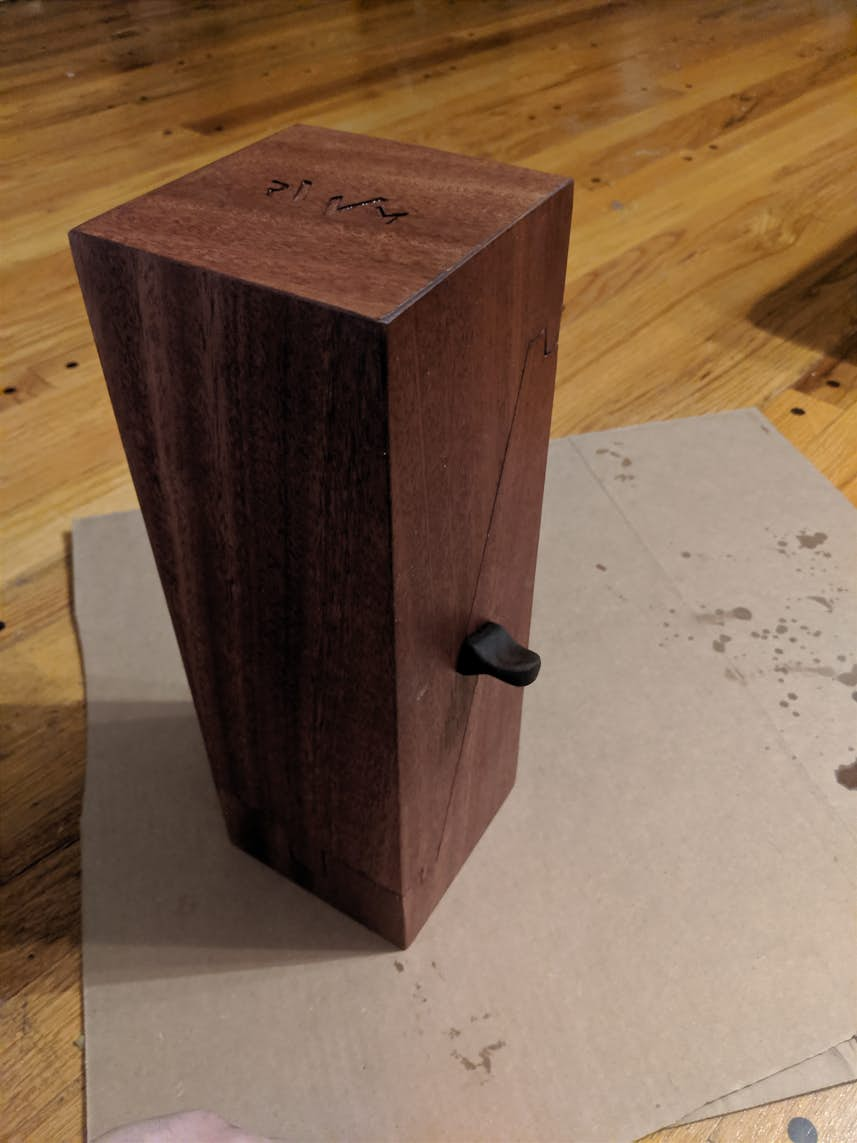

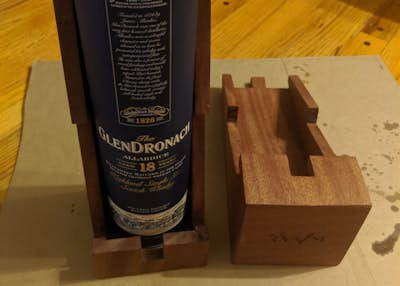
Gift box for a bottle of Scotch
2 hr
Intermediate
138
Files included (2)
1/2" Stock (African Mahogany pictured)
Scrap hardwood for the wedge/keys (Peruvian walnut pictured)
Shaper Origin
Table Saw
Band Saw (optional)
Chisels
Sand Paper
Dremel
To build the box you'll need 4 of the scarf joint pieces and two of the key joints (which include 2 pieces each) for a total of 8 pieces for the sides. For the top and bottom I just cut squares with a table saw, but you could easily use origin for that instead - just cut out a 4.5" square for the top and a 4" square for the bottom. It probably goes without saying but I'll do so anyway - measure what you're putting in the box first to ensure it'll fit. The bottle of scotch I ended up building this for probably won't quite fit using the SVGs that I made - I actually only used origin for the mating surfaces and the long corner seams, then crosscut the assembled sides to length on my table saw once I had the bottle in hand to ensure that they'd be long enough.
In my case I wanted nice square corners on all the mating surfaces, so after cutting out the parts with origin, I used some chisels and sand paper to square off the rounded corners left by the 1/4" bit and then refined the fit of each pair of joining pieces until I was satisfied. Alternatively you could round the corners on the mating surfaces in the svg so that they'll fit together exactly as cut with origin.
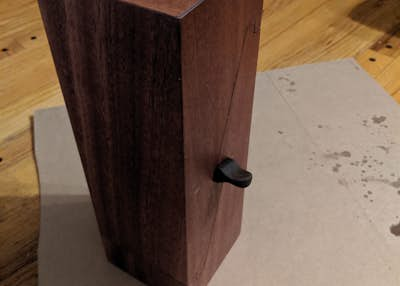
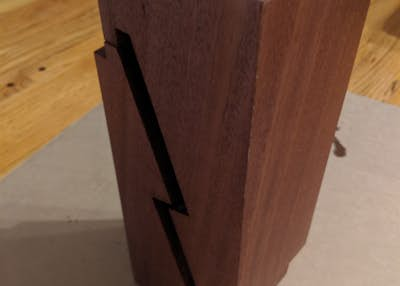
Once you've got all the parts how you want them, you'll need to bevel the corners where the sides will meet each other and where they meet the top. Bevel all sides of the top. I found the easiest way to do this was on a table saw with the blade set to 45 degrees. Tape the two pieces forming each side together and bevel them as a pair. This is especially helpful for the scarf joint faces since there's very little material there to ride the fence otherwise. Note - don't be like me and fail to pay attention to the sides being beveled...I had to recut 2 pieces when I beveled the wrong sides. To make sure you get this lay out the two taped up sides of the scarf joint (since the key joint sides have mirror symmetry they're not an issue) such that they are mirrors of each other. Then mark the sides that are face up as either inside or outside of the box (pick the nicest looking sides as the outside, obviously) and bevel the inside edges.
Rough assemble the pieces with tape and decide where the bottom of the box will be and put a dado on the inside face to accept the bottom - should be about 1/4 " up from the bottom and 1/4" deep. In hindsight you could include this in the svg files and do it with origin, you'd just need to make sure to only do it on half the pieces.
At this point it's time for glue and clamps. I did the glue up by carefully taping the points where a glue joint met one of the surfaces of the joint between the two halves, then taping the two sections of each side together very tightly. Then it was just a matter of gluing it up ensuring that the seam between the two halves is continuous around the entire box.
After glue-up I found that due to some small misalignments I needed to further refine the fit of the two halves. I did this by repeatedly assembling them and finding the tightest point of the seam and taking a little off with a chisel or sand paper and repeating the process until the seam was fairly tight and uniform all the way around. I then sanded all sides of the box with it assembled to ensure that the two halves met nice and flush at the seams. For sanding I used two shims cut to length to assemble the box tightly.
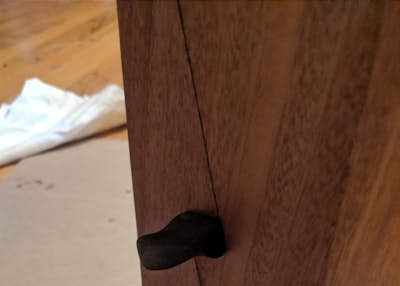
You could probably do the wedges with origin as well, but since I wasn't sure how I wanted them to look until I was making them I ended up cutting them on a band saw and refining the fit with chisels/sandpaper and shaping the finger pull bit by hand with a Dremel and sandpaper.
Once all that's done, some finish (I used danish oil) is all that's left to do!
Finally I'd like to thank user strandboy for sharing his work that ended up being the inspiration for this. You can follow the link below to his project and you'll quickly see that the only creative part I played was the thought to put whiskey in the thing instead of a light. https://community.shapertools.com/t/what-did-you-do-with-your-origin-this-week/1766/333