Simple Catapult
By Brock|BY-NC-SA 4.0 License|Updated April 5th, 2020


A simple catapult that gives you the ability to vary the pull-back distance, launch angle and even the power. It's a fun way to experiment with how the different variables affect the trajectory and distance of the projectile. It's sized for objects about 1" in diameter so marshmallows, bouncy balls, Lego pieces or Nerf Rival balls are all fair game.
1 hr
Intermediate
200
Files included (5)
1/2" plywood (I used baltic birch that is actually 12mm)
7/16" dowel
Rubber bands
Cotter pins
1/4" or smaller cutter
Saw for cutting the dowels
Pin or brad nailer (optional)
Something to help pull the rubber bands through the frame
Cut one each of the 4 SVG's. The depths for any pockets are listed on the SVG itself in blue.
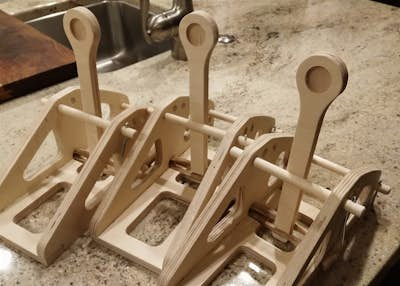
Assemble the frame by gluing the sides to the base. The pocket in the base should line up with the largest round hole in the sides. The pockets in the sides should be to the outside. These are a little difficult to clamp square while gluing so it may be helpful to use a pin nailer or similar to secure the pieces.
Cut 4 lengths of dowel, 2 at 6" and 2 at 1 7/8". For the 2 longer dowels drill a small hole at each end for the cotter pins.
Place one of the shorter dowels through a number of rubber bands. I recommend 20 or more of the roughly 1/8" wide beige colored rubber bands that can be purchased at Walmart. Find some way to pull the rubber bands through both sides of the frame so that you can insert the second short dowel through. I used a spring puller, but anything you can feed through the frame and around the rubber bands, like a length of paracord or a long zip tie, should work.
Drill a small hole near each end of the longer dowels. Place one dowel through each set of holes in the frame. Secure the dowels with cotter pins, but do not bend the cotter pins so far that they become difficult to remove. Actually, the cotter pins are probably not necessary, but things might get interesting if the launch angle dowel were to fall out. (There is probably a better method than cotter pins to keep the dowels in place, so maybe experiment with this step.)
Place the spoon between the longer dowels and through rubber bands and begin rotating the shorter dowels an equal number of turns on each side to tension the catapult. It's probably better to add more rubber bands, rather than more twists, if you want more power. You may need to shift the rubber bands or relieve the bottom rear corner of the spoon a little if the corner touches the ground as the catapult fires.
This was designed for 1/2" baltic birch plywood, which is actually only 12mm thick. The whole project could probably fit on one of those 1' x 2' boards you can find at the craft store. If you use something other than baltic birch I wouldn't bother to change the offsets much to try to get the corners to match better, because any change in offset will affect the size of the tabs and the fit of the minimal corner dogbones designed into the files already.