Letter Blocks
By BanjoBen|BY-NC-SA 4.0 License|Created March 11th, 2019


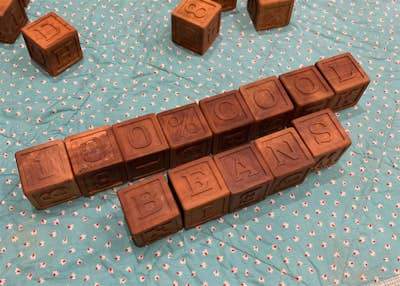

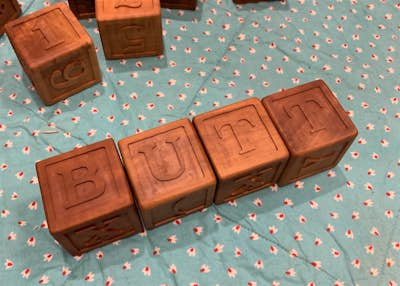

Letter and number blocks for kids
2 hr
Intermediate
41
Files included (45)
wood thick enough to yield 2 inch thick stock, small piece of 3/4 inch plywood
Shaper Origin, 1/8 inch spiral downcut bit, 1/16 inch bit, tools for milling up the stock
Using your preferred methods, mill up stock into 2 inch square bars, and then cut into 2 inch blocks. At this stage, it is crucial to mill the stock as precisely as you can. Ideally, you want to end up with perfectly square 2 inch cubes.
Next, move on to constructing the block jig. Square up a small piece of 3/4 inch ply (the size is not crucial, it just needs to be big enough for the Origin base to ride on). Using a grid, place the block jig template somewhere near the center of the workpiece (remember the grid location!). Do an inside cut all the way through the ply (taking multiple passes of course), and remove the waste.
Check your 2 inch blocks for fit. If they're too tight to slide in and out easily, adjust the offset of the cut a little at a time, until you get a good fit. You want a fit that has as little slop as possible, while still allowing you to slide the blocks in and out relatively easily. Once you're happy with the fit, attach riser blocks to the bottom of your jig, so that when you slide one of the blocks into the jig, the surface of the plywood sits either flush with, or slightly above the block (as shown in the 3rd photo).
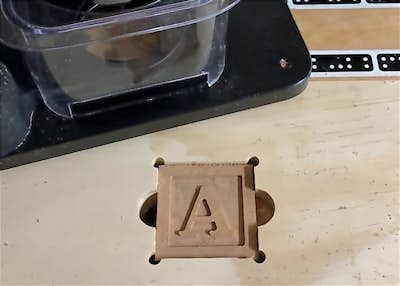
Once your jig is built, set up your Shaper as usual, so that the top of the jig is coplanar with your shaper tape, and slide the first block into the jig. Set up a grid and place your first letter template using the grid location you remembered from earlier. Cut each letter with an inside cut, followed by a pocket cut to clear out remaining waste. From here on out the process involves simply cutting a letter, rotating the block in the jig, cutting another letter, and so on.
Things to consider:
-I wanted to be able to spell words with my blocks, which requires a lot of repeated letters. There are lots of ways to do this. My method was to start labelling the first block ABCDEF, the second BCDEFG, and so on. With some of the less common letters (X, Q, Z for example) I replaced come copies of those letters with math symbols.
-It saves a bit of time if you set up, cut all the A's first, then cut all the B's, and so on.
-As long as you keep the jig clamped in place throughout the whole process, you don't need to set up the grid more than once when cutting the letters.
-You can do almost all of the cutting with the 1/8 inch spiral downcut bit. There are only a few letters where you really need to either use the 1/16 inch bit, or cut the small remaining piece by hand.
-The spiral DOWNcut bit is important. Because the jig only holds the block in place in the xy-direction, the spiral upcut bit can pull the block up toward the Shaper when you're cutting, and ruin the block. The downcut bit puts the cutting pressure down toward the table, and prevents movement. The other option would be to rig up some way of clamping the block in place, but I have not done so.
-The depth of cut is up to you. I did 1/16 inch in the photos above, and I think that works well.
-No matter what you do this will take a while to cut this many letters, but I got pretty decent results by cutting with zero offset throughout, and moving fairly quickly. Doing this allows you to cut each face in about 2 to 3 minutes.
-As mentioned above, if your stock isn't square, or if your dimensions are slightly off, you will notice when you rotate the blocks in this tight-fitting jig, and it will be frustrating.
-If you don't have access to wood of sufficient thickness, you can of course scale the images down and adjust accordingly. But if you do so, you'll run into more places where you need to use the 1/16 inch bit.
-When making the block jig, use a set of calipers to precisely measure your blocks. If they're a few thousandths under 2 inches, use an offset on the first cut, so you don't make the hole too big on the first pass.